
Send Us Your Files!
We use WeTransfer to manage our file transfers. Send us up to 2GB per file and keep it private and secure.
If your file is larger than 2GB, call us at 513.2251.5700
If you’re in need of help in getting your file ready for print, our team of graphic designs are here to help, but if you are feeling brave and want to tackle it yourself here are some tips that will help you. In order to achieve the best print, we ask that your files comply with the below requirements.
File types we accept:
If possible, provide a layered file. It will help in the printing process.
- What is a layered file and why we need it – All of the programs that we noted above; Adobe Illustrator, InDesign, and Photoshop, provide files with layers that can be edited individually if there is an issue with the file when printing. A layered file provides the best way to adjust the file in any way needed to achieve the best print quality possible and to reach the desired size of the finished print.
Composite (Flattened) File
Always save a composite (flattened) image as well as the layers of your document. All files can be flattened. This combines all the layers into a single layer in order to achieve a non-editable version. The purpose of flattening your artwork is to preserve and reduce the file size of the approved design. You will not be able to reopen and edit after flattening and saving an image. This file is to be used as a guide to make sure all elements of the layered file transferred to us properly.
If using InDesign, Send Packaged Files
For easy hand-off, gather all the files you’ve used. InDesign files depend on fonts and linked graphics that must be sent along with the native file in order to work properly. This is where the Packaging command is helpful. Luckily, InDesign makes this very easy to do by following the steps below to package your file.
- Open your INDD file in InDesign.
- Resolve any errors concerning missing links or fonts.
- Go to File: Package.
- Click the Package button at the bottom of the Summary window (preflight window).
- Click continue on the “Printing Instructions” window.
- Browse to where you’d like to create the package folder and enter the name of the folder.
- Make sure that the “Copy Fonts,” “Copy Linked Graphics,” “Update Graphic Links in Package,” and “Include Fonts and Links from Hidden….” are all checked. Other boxes should be unchecked.
- Click the package button.
- Find the new folder that InDesign created and verify that it contains copies of all required files.
- Right-click the folder and choose “Compress” (Mac) or “Send to ZIP” This will create a zip file.
- Send compressed file via WeTransfer
Steps for setting your file up for printing:
- Creating a vector file
Vector files allow for more flexibility because they are constructed using mathematical formulas rather than individual colored blocks. These files can be drastically sized with no loss in quality. This means vector images can be significantly enlarged or decreased while maintaining smooth, crisp edges. All text and logo elements should be in a vector format for best print results.
File format for vector files: ai, eps, psd, pdfs originating from vector files
Programs to use: Adobe Illustrator or Adobe Photoshop
2. What is ‘Image Resolution’?
Digital images are made up of thousands of pixels (blocks of color). The number of pixels printed per inch is known as the image resolution, which determines the quality of the print. Therefore, the higher number of pixels means higher quality, clearer imagery and the best print possible. Here is a small table on different DPI’s (density per inch) of images.
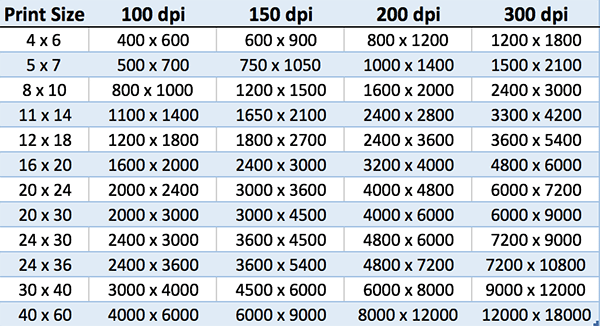
Recommended resolution for printing: 300dpi (can be lower depending on size of print)
Note: Images downloaded from the internet do not print clearly due to their resolution being somewhere between 72 dpi and 100 dpi.
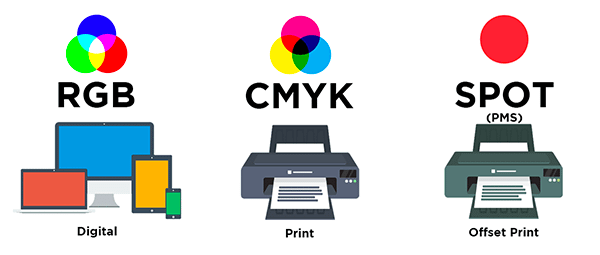
3. Create file with CMYK in mind
No matter if you set up the design with RGB, we only print in CMYK. It is very rare that a computer monitor will accurately display the colors chosen in your layout. Your images may print in black and white or with inaccurate color if you neglect to convert images.
Produce a Print-Ready Adobe PDF file
If you’re using a color-managed workflow, you can use the precision of color profiles to perform an on-screen preview (a soft proof). Examine how your document’s colors look when reproduced on a particular output device.
Note: Unless you are using a color management system (CMS) with accurately calibrated ICC profiles and are sure that you have properly calibrated your monitor, don’t rely on the on‑screen appearance of colors.
- Prepare the document for exporting to Adobe PDF.
- Export using preset: PDF/X-1a2001
- Compression: Color Images: 300 ppi, Grayscale Images: 300 ppi, Monochromatic Images: 1200 ppi.
- Marks and Bleed: Select to include bleed if you have built this into your document
- Output: Color Conversion: No Color Conversion, Profile Inclusion Policy: Include All Profiles
- Proof and correct the PDF file.
- Send the press-ready PDF via WeTransfer
Inadequate Bleeds
A bleed is any area on a printed sheet where ink extends to the cut edge. One problem of inadequate bleeds is that an image that you expect to extend to the edge will show a tiny white line on the trimmed edge. It leads to an unpolished, unfinished look that you want to avoid. We require at least 1/8 (.1250) bleed.