There are a ton of fantastic tools found within Acrobat DC, but a lot of them are hard to find; like the color conversion and previewing tools. These tools allow you to quickly and easily identify and evaluate color and other characteristics (like resolution) of any image in a PDF document. Additionally, if you so feel the need, you can even change the colors of the image from directly within the PDF! Below I’ve outlined eight tips that will show you how to accomplish all of this.
Tip 1: Create a copy of the PDF
Never, and I mean NEVER, edit your master file; always create a duplicate of the master file and edit that one. Hopefully you won’t make any massive mess-ups, but if you do, you’ll only be making them to the duplicate, not the original file.
To create a duplicate of your file, open the PDF file and navigate to File > Save As and save your working file with a file name that distinctively, and easy, marks it as the duplicate (I’d recommend something like adding _DUP to the file). This will protect the integrity of your original PDF document. You could also simply make a copy of your PDF document through your operating system or Bridge interface. However, using Save As through Acrobat DC will simplify your PDF by removing any unused and unnecessary document components.
Tip 2: Launch Output Preview and view the colors
In order to see detailed information about the file, you’ll need access to the ‘Print Production’ tool. To get this, click on View > Show/Hide > Tools Pane. Once you’ve done that, you’ll see a new tool bar pop up on the right side of your Acrobat DC screen.
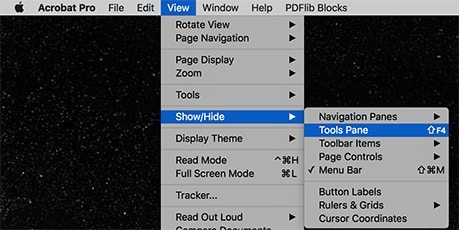
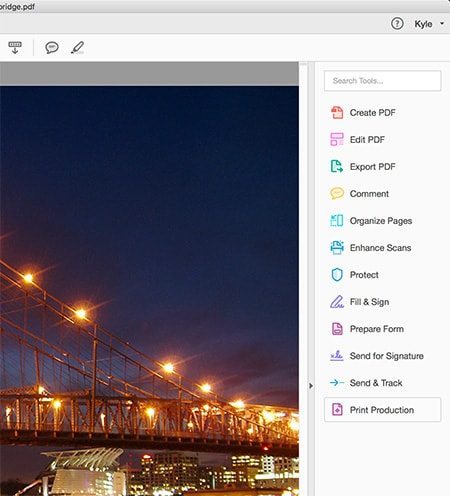
Once you’ve clicked on Tools Pane you’ll see a new menu pop up in Acrobat DC on the right hand side that has a ton of options present. We’ll be focusing on the Print Production section, so click on that.
Within the Print Production menu, you’ll see the right menu has been replaced with new choices now and by clicking on each one you’ll be able to do different things to, and see different things about, the PDF file. Click on the Output Preview, which is the top option.
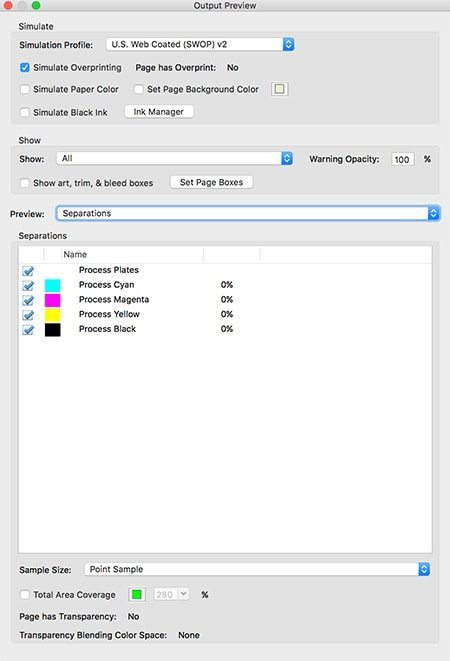
Here you’ll see all the colors that are found within the PDF file. Each color is represented individually and shows how it is combined with other colors to make each color of the file. If you move your cursor around the file, you’ll see the percentage numbers change, showing how each color is made
Tip 3: How to find specific colors
You can use the Output Preview to locate and view specific colors. To simply do this just check the color to view it and uncheck to hide. If I wanted to check the Process Cyan color, all I’d need to do is just uncheck the Process Magenta, Process Yellow, and Process Black. It would appear black because this is how it would print on a separated plate. The actual green spot color would be applied on press. If you have more than one color, each color will appear separately in the list and can be rendered either visible or invisible by checking its display check box.
Tip 4: View just the black plate
Another very useful display capability is your ability to view just the black plate. To do this, simply uncheck all the plates except for black. All the text and objects containing black ink will be visible (not just those that appear black). You can also view any grayscale images or graphics in your PDF, such as the logos and bar code in this PDF. This black display is also useful for viewing the black ink contribution to color images that will be printing as CMYK.
Tip 5: View the values of each color ink
You can also determine both the individual and the total ink values of any portion of any image or area in your PDF. First, make all of the color plates in the Output Preview dialog visible. Then simply move your cursor around the text and images in your PDF to see the ink values appear in real time.
In my example I placed the cursor over the water at the base of the bridge and received values of the Process colors as: C = 1%, M = 62%, Y = 100%, K = 0%. The added combination of these four inks, displayed here as Total Ink Coverage, is equal to 163%.
Tip 6: View excessive ink values
In addition to being able to view ink densities of specific locations in your PDF, you can also view all the areas that have ink densities that exceed a specific Total Ink Coverage. This is very useful for quickly determining which areas in your image will contain shadow detail and which will print without detail. To view the areas that will print without detail first, set the maximum value of Total Ink Coverage that can be printed and still show detail on the output device on which you will be printing your PDF.
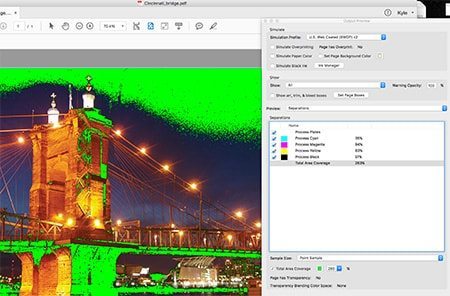
To do this check Total Area Coverage and enter your value in the text box. This value may be as low as 240 for some newspapers and presses and as high as 340 for a coated stock printed on a commercial sheetfed press. The areas in your PDF that exceed a Total Area Coverage of 300% will be highlighted in the color you choose from the color swatch to the left of the Total Area Coverage field value. (I used bright green.)
Tip 7: Previewing Overprints and Rich Blacks
You can also preview any objects in your PDF that will be overprinting and printing as rich blacks—which are areas that are assigned colors created with K plus another color to print with higher density.
To view your overprints and rich blacks, select Color Warnings from within the Preview window. To view all objects that will be overprinting (printing on top of any colors that are beneath them), check Simulate Overprinting. All overprinting objects will be highlighted in the Overprinting color. Similarly, to display all of your rich black objects, check Rich Black. All rich black objects will be highlighted in the assigned color. You can also specify a minimum ink value above which an object will be considered a rich black. This ability to view rich blacks is useful for previewing those areas that will be printing as high-density areas with no detail.
Tip 8: Simulate how your printed document will look
Of all the previewing capabilities that Acrobat DC supports, one of the most useful in terms of predicting significant changes that may occur during printing is your ability to simulate the effects of a printing environment, and especially the impact of choosing a specific paper stock.
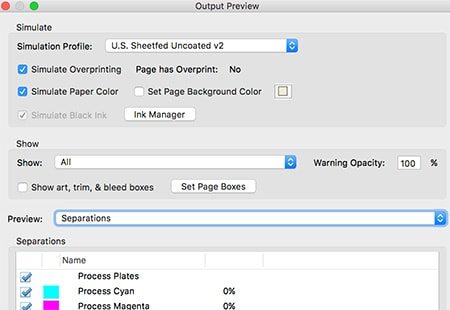
From the Simulation Profile pop-up menu at the top of the Output Preview dialog, select any of the options form the list. This selects a color profile that contains characteristics that exist for printing on coated paper stock on a typical sheetfed commercial printing press. To finish up the simulation of the print setup, check Simulate Paper Color and Simulate Overprinting just below. This setup will now send display adjustment instructions that will attempt to simulate the appearance of the print on screen to your monitor.
With this setup, you’ll likely see a slight darkening and reduction of contrast on screen. Toggle the Simulate Paper check box off and on to compare the difference.